A-Z Construction & Restoration

📍 Syracuse & Central NY

EARLY SUMMER SPECIAL: Free Foundation & Chimney Inspections

📞 Call Now: 315-488-5292

Why Ignoring Small Foundation Cracks Can Double Repair Costs

Why Ignoring Small Foundation Cracks Can Double Repair Costs

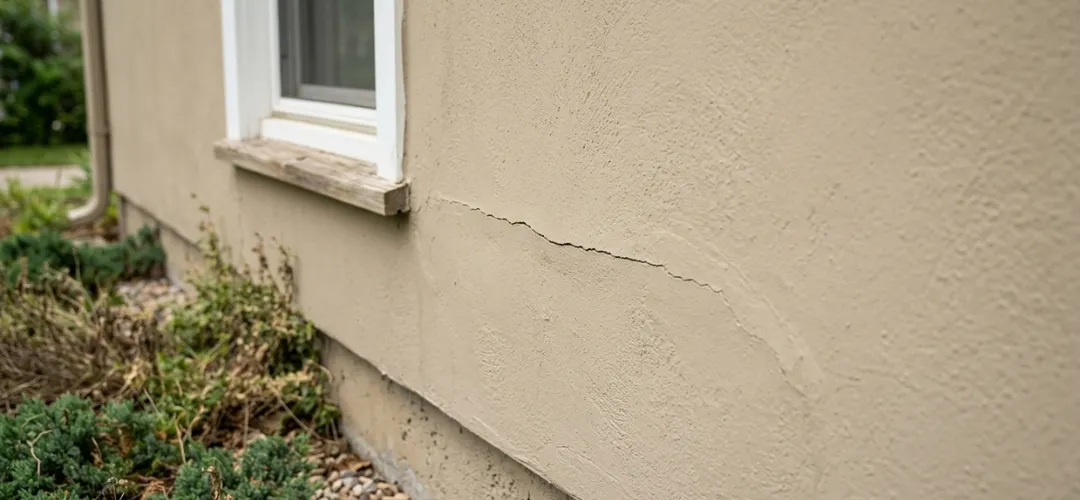
You have probably walked past that thin line in your basement wall a hundred times. Maybe you noticed it when you moved in, or maybe it showed up after last winter. Either way, you told yourself it was no big deal. Just a small crack. Every house has them.

Here is the thing about foundations. They do not send you a warning letter before they fail. That little crack is the letter and it is the first whisper of a problem that will only get louder. Water, soil pressure, and changing temperatures will take that hairline and turn it into a gap you cannot ignore.

So before you shrug and walk away, ask yourself this. How serious are small foundation cracks? The answer is that they are not serious yet. But give them time, and they will be. And by then, the fix will cost you ten times as much.

What Causes Small Foundation Cracks (And Why They Don’t Stay Small)

Small foundation cracks do not appear out of nowhere. They start when the ground beneath your home shifts, when rainwater soaks into the soil and freezes, or when your house settles unevenly over time. A little movement here and there is normal, but those small cracks are the first sign that something is happening.

But can small cracks in foundation get worse over time? Absolutely. Think of it like a crack in your windshield. One pothole does not break the glass, but that tiny chip spreads a little more every time you hit a bump. Your foundation works the same way. Every freeze-thaw cycle pulls the crack wider. Every heavy rain pushes water deeper into the gap. Every season of dry soil lets the ground shift a little more.

What causes small foundation cracks to get worse? Water is the biggest reason. When moisture seeps into a crack and freezes, it expands. That expansion puts pressure on the concrete, forcing the crack wider. Then more water gets in, and the cycle repeats. Add in soil pressure pushing against your foundation walls, and that hairline crack becomes a structural headache.

Small foundation cracks left alone do not heal. They grow. And what starts as a cosmetic nuisance becomes a real problem.

How Serious Are Small Foundation Cracks? (The Danger Spectrum)

Not all cracks are created equal. Some are cosmetic and others are warning signs of structural foundation issues. The difference comes down to three things. Where the crack is, which way it runs, and whether it is growing.

Vertical foundation cracks are the least threatening. These usually happen when concrete shrinks as it cures or when the house settles a tiny amount. A vertical crack under a quarter inch wide is rarely an emergency. Monitor it, seal it, and move on with your life.

Horizontal foundation cracks are a different story. These run side to side across your wall, and they mean soil or water is pushing from the outside in. Hydrostatic pressure is real, and it is strong enough to bow your walls over time. A horizontal crack is not a suggestion, it is a warning.

Crack Orientation and Urgency

Crack Type

Orientation

Typical Severity

Action Needed

Hairline

Random fine lines

Low

Monitor, seal if desired

Vertical

Up and down

Low to moderate

Seal, monitor for growth

Diagonal

Angled across wall

Moderate

Inspect, likely seal

Horizontal

Side to side

High to severe

Professional evaluation needed

Stair step

Zig zag in masonry

Moderate to severe

Inspect, may need structural repair

Structural foundation issues show up in other ways too. Sticking doors and windows, uneven floors, or cracks above door frames all point to movement. A vertical foundation crack that keeps growing month after month is not settling, it is shifting. And shifting means your foundation is still moving.

The danger spectrum is simple. If the crack is thin, vertical, and not changing, you probably have time. If it is horizontal, wider than a quarter inch, or growing, call someone. You don’t want to find out what happens if foundation cracks are left untreated.

What Happens If You Ignore Foundation Cracks

Ignoring a crack does not make it go away. It makes it worse.

Water Seeps In

That tiny crack is an open door for groundwater. Once moisture gets through, you are looking at wet basements, musty smells, and the perfect conditions for mold. A little dampness becomes a puddle and that puddle becomes a reason to replace drywall and flooring.

Soil Pressure Builds

The ground outside your foundation never stops pushing. Waterlogged soil expands and presses against your walls. A hairline crack turns into a bowing wall. A bowing wall turns into a structural failure waiting to happen.

Cracks Spread

What happens if you ignore foundation cracks is simple. They do not stay in one place. A vertical crack branches into diagonal cracks. New cracks appear near windows and doors. The damage spreads like a spiderweb across your basement walls.

Your Home Shifts

Your foundation holds up everything else. When it moves, so does the rest of the house. Floors become uneven. Doors stop latching. Drywall cracks appear upstairs where there were none before. A basement problem becomes a whole house problem.

The Repair Gets More Invasive

  • Early stage: epoxy injection ($300 – $1,500)
  • Moderate stage: carbon fiber straps or wall anchors ($2,000 – $6,000)
  • Advanced stage: piering or underpinning ($5,000 – $20,000+)

Why small foundation cracks should not be ignored is all about timing. Fix one crack today for a few hundred dollars. Wait until your walls bow and you are looking at a five figure repair bill.

Foundation damage repair is always cheaper when the damage is small. Always.

The Cost Escalation – From Small Fix to Major Repair

Here is where the numbers get real. Fixing a crack early costs a few hundred dollars. Ignoring it until your walls start moving costs thousands. The difference is not small, and it adds up fast.

Early Stage: Epoxy Injection

When you catch a crack while it is still thin and vertical, a professional can inject epoxy or polyurethane foam directly into the gap. This seals the crack, prevents water intrusion, and costs anywhere from $300 to $1,500. Not cheap, but manageable.

Moderate Stage: Carbon Fiber Straps or Wall Anchors

If you wait too long and the crack widens or your wall starts bowing, epoxy will not cut it anymore. You need carbon fiber straps to reinforce the wall or steel wall anchors to stabilize it from the outside. This jumps to $2,000 to $6,000.

Advanced Stage: Piering or Underpinning

Once the foundation has settled significantly or the wall is leaning dangerously, you are looking at piering or underpinning. Steel piers are driven deep into the ground to stabilize your foundation. This is major structural work, and it runs from $5,000 to $20,000 or more.

Foundation Repair Cost Comparison

Stage

Repair Method

Typical Cost

Early

Epoxy injection

$300 – $1,500

Moderate

Carbon fiber / wall anchors

$2,000 – $6,000

Advanced

Piering / underpinning

$5,000 – $20,000+

What is the average cost to repair a cracked foundation depends entirely on how long you waited. Fix it early and you might pay $800. Wait until your basement walls bow and you are writing a check for $15,000.

Cost to repair foundation is not just about the crack itself. Water damage, mold remediation, drywall repair, and landscaping restoration add thousands more. How much does foundation repair cost when you factor in everything? More than you want to spend, but less than ignoring it.

Foundation Crack Repair Solutions (What Actually Works)

Not every crack needs the same fix. Picking the wrong solution wastes money and leaves your foundation vulnerable. Here is what actually works at each stage.

DIY Crack Sealers (Cosmetic Only)

For hairline cracks that are not growing and not leaking, a tube of concrete crack filler from the hardware store might do the job. This is surface level only. It will not stop structural movement or seal against serious water pressure.

Epoxy Injection (Active Cracks)

Foundation crack repair for active but non-structural cracks starts with epoxy or polyurethane foam. Professionals inject it deep into the crack, where it bonds to the concrete and blocks water permanently. This works for vertical and diagonal cracks under a quarter inch wide.

Carbon Fiber Straps (Bowing Walls)

When a wall starts leaning inward from soil pressure, epoxy alone will not fix it. Carbon fiber straps are applied vertically across the crack and bonded to the wall with high strength epoxy. They stop further movement and add serious reinforcement.

Wall Anchors and Steel Beams (Severe Bowing)

For walls that have already moved significantly, you need mechanical stabilization. Steel wall anchors are installed outside in the soil and connected to steel beams inside. This allows you to actually straighten the wall over time.

Piering and Underpinning (Settlement Issues)

When your foundation is sinking or settling unevenly, the fix is not on the wall, it is under the ground. Steel piers or concrete pilings are driven deep into stable soil to lift and support the foundation. This is major work, but it is the only permanent solution for settlement.

Pro Tip: Foundation crack repair solutions are not one size fits all. A vertical crack needs different treatment than a horizontal one. A wall that has stopped moving is different from one that is actively bowing. Get a professional assessment before you spend money on the wrong fix.

Conclusion

A hairline crack today becomes a horizontal crack tomorrow. Ignore it and you go from a $500 epoxy fix to a $10,000 wall stabilization project. Water seeps in, soil pressure builds, and your foundation keeps moving. Catch it early, fix it right, and save yourself a massive repair bill.

If you have been staring at a crack and hoping it will go away, stop waiting. A-Z Construction specializes in foundation repair and basement wall stabilization, stopping small cracks before they become structural emergencies. We know clay soils and freeze-thaw cycles, and we have been fixing foundations since 1986. Call us at 315-488-5292 or visit https://a-z-construction.com/foundation-crack-repair-syracuse-ny/ to learn more.

Frequently Asked Questions

  1. What are the first signs that a small foundation crack is serious?


If the crack is widening, horizontal, or accompanied by sticking doors, uneven floors, or water seepage, it may indicate structural movement and should be inspected.


  1. Can small foundation cracks turn into major structural damage?


Yes. Small cracks can expand due to soil pressure, moisture, and temperature changes, eventually leading to bowing walls or foundation settlement.


  1. Should I repair small foundation cracks immediately?


Yes. Early repair is cheaper and prevents water intrusion and structural deterioration that can significantly increase repair costs later.


  1. What type of foundation crack is most dangerous?


Horizontal cracks are the most serious because they usually indicate pressure from soil or water pushing against the foundation wall.


  1. How do professionals fix foundation cracks?


Depending on severity, professionals use epoxy injection, carbon fiber reinforcement, wall anchors, or piering systems for structural stabilization.

5 Reasons Your Concrete Sidewalk Is Cracking Faster Than It Should

5 Reasons Your Concrete Sidewalk Is Cracking Faster Than It Should

Concrete is supposed to last decades. So when you start noticing cracks in your concrete sidewalk after just a few years, or even a few months, it’s frustrating. And honestly, it’s more common than it should be.

Some cracking is normal. Concrete moves, settles, and responds to temperature changes over time. But premature cracking? That’s usually a sign something went wrong, either during installation, in the surrounding environment, or with ongoing maintenance.

This post breaks down the five most common causes of sidewalk cracking, what each one actually looks like in practice, and what you can do about it before small cracks turn into serious trip hazards or costly replacements.

1. Poor Installation From the Start

This one stings a little, especially if you paid for professional work.

Poor concrete installation is one of the most common causes of premature sidewalk failure, and it’s not always obvious until cracks start showing up months later. The most frequent culprits:

  • Too much water added to the mix: Contractors sometimes add water to make concrete easier to work with. That shortcut weakens the final product and makes it far more prone to cracking.

  • Inadequate base preparation: If the sub-base isn’t properly compacted before the pour, the concrete has nothing solid to rest on. It shifts, settles unevenly, and cracks.

  • Finishing too early: Working the surface while bleed water is still rising traps moisture inside and reduces surface strength.

  • Wrong concrete thickness: Sidewalks should typically be poured at a minimum of 4 inches. Anything thinner simply can’t handle regular load and foot traffic.

But what can you do about it? For minor surface cracks, concrete crack filler can buy you time. For structural failures rooted in a bad pour, full panel replacement is usually the only real fix.

2. Missing or Misplaced Expansion Joints

Here’s something most homeowners don’t know: concrete needs to crack in certain places. That’s what concrete expansion joints are for.

When concrete heats up, it expands. When it cools, it contracts. Without planned relief cuts, that movement has nowhere to go — so the slab cracks wherever it wants to, which is rarely convenient.

Expansion joint problems look like this:

  • Joints that are spaced too far apart (industry standard is roughly every 4 to 6 feet for sidewalks)
  • Joints that weren’t cut deep enough to actually guide the crack
  • No joints at all in longer sections of concrete

A well-cut control joint essentially creates a weak point on purpose. So when cracking occurs, it happens along that line and stays hidden rather than running across the middle of a slab.

This is a design and installation issue. If your sidewalk was laid without proper jointing, no amount of patching will fully solve the problem. Resurfacing with intentional saw cuts added afterward can help, but full sidewalk replacement is often the more practical long-term answer.

3. Tree Roots Pushing Up From Below

This is one of the most visually obvious, and most underestimated, causes of sidewalk damage. You’ve seen it: a slab that’s been lifted at an angle, with a visible ridge running underneath and a crack spreading outward from the edge.

Tree roots damaging sidewalks is a classic slow-motion problem. Roots follow moisture and grow toward it. If that means pushing through or under your concrete, they will.

A few things make this worse:

  • Trees planted too close to the sidewalk: Mature trees with aggressive root systems (maples, oaks, willows) cause the most damage
  • Shallow root systems: Some species spread roots near the surface rather than deep underground
  • Older sidewalks with gaps: Roots find the path of least resistance

The fix isn’t simple. Cutting the root can stress or kill the tree. Removing the tree solves the root problem but leaves a disrupted soil bed that still needs to be taken care of before you repour. Many municipalities handle sidewalk trip hazard repairs caused by tree roots so it is worth checking with your local public works department if the tree is in a right-of-way strip.

For homeowners, options include grinding down the raised edge (a short-term fix), installing flexible sidewalk panels designed to handle root growth, or full replacement paired with a root barrier.

4. Freeze-Thaw Cycles and Water Infiltration

If you live anywhere with cold winters, this one is working against your sidewalk every single year.

Freeze-thaw concrete damage happens when water seeps into small pores or hairline cracks in the slab, then freezes. Water expands by about 9% when it freezes. Do that repeatedly — every winter, sometimes multiple times a week during temperature swings — and the concrete literally breaks apart from the inside.

Signs of freeze-thaw damage:

  • Spalling: Chunks of the surface flaking or popping off
  • Surface scaling: A rough, pitted appearance where the top layer has deteriorated
  • Widening cracks: Small hairline cracks that grow noticeably wider season over season

Deicing salts make this even worse. They help melt ice, but they also accelerate moisture infiltration and chemical breakdown of the concrete surface. If you’re using rock salt on your sidewalk every winter, you’re speeding up the damage cycle.

What actually helps:

  • Seal your concrete every 2 to 3 years with a quality concrete sealer to reduce water absorption
  • Switch to sand or a calcium magnesium acetate-based deicer instead of sodium chloride
  • Address any cracked sidewalk repair in the fall before the first freeze since open cracks let water in faster

5. Soil Movement and Poor Drainage Underneath

The ground your sidewalk sits on is never completely still. Soil shifts, erodes, expands when wet, and shrinks when dry. When that movement isn’t accounted for, you get sidewalk settling — and eventually, cracks.

This is especially common in:

  • Clay-heavy soils that swell significantly when saturated and shrink when dry
  • Sandy or poorly compacted fills that erode or shift under load
  • Areas with inadequate drainage where water pools under the slab and softens the base

Think about a sidewalk panel that’s sunk on one end and raised on the other. That’s settlement in action. The slab is trying to follow the ground beneath it, but concrete doesn’t flex so it breaks instead.

Common drainage-related mistakes that lead to this:

  • Downspouts that direct water toward (not away from) the sidewalk
  • No gravel base layer under the concrete pour
  • Grading that causes water to collect along the sidewalk edge

Here’s the rule of thumb: If your sidewalk is cracking in a diagonal pattern across a single panel, it’s almost always a soil or drainage issue. Water found its way under, softened the base, and the panel cracked along the stress line.

The fix starts underground. Sidewalk repair without addressing drainage or base issues will just keep repeating itself.

Don’t Wait Until a Small Crack Becomes a Big Problem

Premature sidewalk cracking almost always comes back to one of five things. A poor initial pour, missing expansion joints, tree root pressure, freeze-thaw damage, or shifting soil underneath. Once you understand the cause, the right fix becomes obvious. The key is catching these issues early, before a hairline crack turns into a sunken slab or a genuine trip hazard that costs far more to address.

If your sidewalk is already showing signs of damage, A-Z Construction specializes in Concrete Sidewalk Repair. From freeze-thaw damage and salt deterioration to trip hazards and sunken slabs, we have been repairing and replacing sidewalks for years, so you’re in experienced hands. Call 315-488-5292 or visit https://a-z-construction.com/concrete-sidewalk-repair-syracuse/  to learn more.

Frequently Asked Questions

  1. Are small sidewalk cracks something to worry about?

Hairline cracks are often early signs of movement, but they should be sealed quickly to prevent water from entering and causing deeper structural damage.

  1. Can cracked concrete sidewalks be repaired without replacing them?

Yes, minor surface damage can often be fixed with patching or sealing, but deeper structural issues usually need partial or full replacement.

  1. What causes sidewalks to crack the most over time?

The most common factors are poor installation, soil movement, water damage, and temperature changes that slowly weaken the slab.

  1. How do tree roots affect concrete sidewalks?

Roots grow underneath slabs seeking moisture and can lift or shift concrete, leading to uneven surfaces and visible cracking over time.

  1. When should a damaged sidewalk be fixed?

Repairs should be done as soon as cracks or uneven sections appear, since delays often make the damage worse and more expensive to correct.

Chimney Rebuild vs Repair: 5 Key Differences Homeowners Miss

How to tell if your bowing basement wall needs stabilization — or replacement

You’re sitting by the fireplace, enjoying a cold evening, when you notice something odd about your chimney. Maybe it’s a faint crack in the brickwork, or perhaps there’s a draft where there shouldn’t be. And now you’re wondering: “Is it better to repair or rebuild a chimney?”

Here’s the thing. Your chimney isn’t just a decorative piece. It’s a hardworking part of your home’s heating and ventilation system, and when it starts showing signs of wear, the decision to repair or rebuild isn’t always straightforward. Do you patch up the cracks and call it a day, or is it time for a full rebuild?

In this blog, we’ll break down the difference between chimney repair and rebuilding, highlight the signs chimney needs repair or rebuild, and help you make the best choice for your home. So whether you’re worried about costs, safety, or long-term value, we’ve got you covered.

What is the Difference Between Chimney Repair and Rebuilding?

Before you start calling contractors in a panic, let us clear up exactly what these two terms mean. So, if you are sitting there wondering, what is the difference between chimney repair and rebuilding? The simplest answer comes down to the scope of the problem.

Think of chimney repair as a targeted fix. It focuses on addressing specific, isolated issues without tearing down the actual structure. If your chimney has a few cracked bricks, worn out mortar, or a damaged cap letting water sneak in, a repair is usually all you need. For example, a mason might come in to perform tuckpointing, which is just a fancy term for scraping out the old, crumbly mortar and replacing it with fresh material. It is a lot like getting a cavity filled at the dentist. It is quick, effective, and leaves the main structure entirely intact.

On the other hand, rebuilding is exactly what it sounds like. It involves tearing down part or all of the chimney and constructing it from scratch. You are not just patching a hole; you are replacing the structural integrity of the masonry itself. If your chimney looks like the leaning tower of Pisa, has massive vertical cracks, or the brickwork is actively crumbling into your yard, a repair will not cut it.

5 Key Differences Between Chimney Repair and Rebuild

Now that we have the definitions out of the way, let us dive into the details. When you are weighing chimney repair vs rebuild, it is easy to get caught up in the stress of the situation. But to make the smartest choice for your home, you need to look at the bigger picture. Here are the five biggest differences you should keep in mind.

1. Structural vs Cosmetic Issues

Repairs are all about fixing cosmetic or minor surface issues. Think of crumbling mortar, a few cracked bricks, or a rusted cap. These are problems that do not threaten the actual stability of your chimney. A rebuild, however, handles full structural failures. If your chimney is leaning, bowing, or dropping bricks onto your patio, a surface repair is like putting a tiny bandage on a broken leg. You need a rebuild to restore the structural integrity.

2. Cost Comparison

Let us talk about the budget. Homeowners always ask, is it cheaper to repair or rebuild a chimney? The short answer is yes, at least upfront. The average chimney repair cost is significantly lower because it requires less labor and fewer materials. However, if your chimney is in terrible shape, paying for repeated repairs will eventually drain your wallet. In those cases, the higher upfront chimney rebuilding cost is actually the more economical choice because it fixes the problem permanently.

3. Longevity and Durability

A solid repair can buy you a few extra years. It keeps the water out and makes everything look neat again. But it is still an old structure. Rebuilding gives you a completely fresh start. When you tear down the damaged masonry and build it back up with brand new materials, you are resetting the clock. A rebuilt chimney can easily last fifty years or more with proper maintenance.

4. Safety and Code Compliance

Building codes change over the years. A chimney constructed forty years ago might not meet today’s strict safety standards. Repairs only fix the immediate damage on an outdated structure. Rebuilding, on the other hand, makes sure your new chimney complies with modern fire safety codes, giving you and your family much better protection and peace of mind.

5. Underlying Causes

Sometimes a crack is just a crack. But other times, it is a sign of a much larger issue like a sinking foundation or severe internal water damage. Chimney repairs usually just address the surface symptom. A rebuild allows professionals to get right down to the root cause of the problem. They can fix the underlying footer or correct the drafting issues before building everything back up correctly.

Understanding these differences helps clear up the confusion. But you might still be wondering if pulling the trigger on a massive project is truly necessary.

Is Chimney Rebuild Worth It?

You are probably staring at the contractor quotes and asking yourself the big question. Is chimney rebuild worth it when a quick fix seems so much easier? It is a totally fair concern. But let us look beyond the price tag and think about the future of your home.

When deciding between a chimney repair or rebuild, you have to consider the long term value. Sometimes a basic chimney restoration just is not enough to reverse years of weather damage, water intrusion, or structural settling. If your masonry is leaning visibly or falling apart from the inside out, applying a fresh coat of mortar is like putting a tiny bandage on a broken arm.

Professionals who handle chimney repair and rebuilding will tell you that starting from scratch is often the smarter investment. Here is exactly why taking the plunge pays off.

  • Unmatched Safety: A crumbling structure is a huge hazard to your family and your property. Rebuilding eliminates the risk of a sudden brick collapse and ensures dangerous exhaust gases stay outside where they belong.

  • Better Heating Efficiency: A brand new setup means proper drafting. Your fireplace will burn fuel more efficiently and keep the warm air inside your living room instead of letting it escape through unseen cracks.

  • Modern Code Compliance: Old houses have plenty of charm, but their masonry often fails to meet today’s strict safety standards. A rebuild brings everything up to modern building codes, which is a massive selling point if you ever decide to list your house.

At the end of the day, spending money on constant patch jobs adds up fast. Tearing it down and starting over gives you true peace of mind and adds solid equity to your property. But before you make that final call, you probably want to know exactly what kind of numbers we are talking about.

How Do You Know If Your Chimney Needs Rebuilding?

Before we get into the exact numbers, you need to figure out what state your masonry is actually in. You might be standing in your yard right now thinking, how do you know if chimney needs rebuilding instead of just taking a quick patch job? It usually comes down to spotting the warning signs.

Grab a flashlight, step outside, and look for these clear indicators that your structure needs serious help:

  • Visible Leaning: If your masonry tilts to one side, the structural integrity is already gone. A basic surface fix cannot correct a failing foundation or severe shifting.
  • Spalling Bricks: When the faces of your bricks flake off and litter your roof or patio, moisture has destroyed the masonry from the inside out.
  • Severe Mortar Loss: Massive gaps between bricks where mortar used to sit mean the structure has completely lost its binding agent.
  • Heavy White Staining: Thick, fuzzy white salt deposits, known as efflorescence, signal heavy, ongoing water damage deep within the walls.

When you spot multiple items from this list, calling a qualified chimney repair & rebuild service is your smartest next move. Experts who specialize in chimney rebuilding and repair know exactly how to evaluate the internal damage that an untrained eye misses. They will map out your specific chimney rebuild and repair options, so your home stays safe, functional, and up to code.

Now that you know what warning signs to look out for, let us talk about what this kind of project might do to your wallet.

What is the Average Cost to Rebuild a Chimney?

You have inspected the bricks, spotted the warning signs, and finally accepted that a fresh start is the best path forward. Naturally, your next thought is focused entirely on the budget. If you are typing, what is the average cost to rebuild a chimney? into your search bar, you are probably bracing yourself for a massive number. The truth is, the final price tag depends heavily on a few specific details about your home.

Generally speaking, you can expect to spend anywhere from $1,500 for a partial job to over $10,000 for a complete teardown and reconstruction. Let us break down exactly where that money goes and what factors influence your final bill.

  • Extent of the Damage: A partial rebuild, which usually covers everything from the roofline up, is the most common and affordable option. If the foundation is solid but the top part is crumbling, you will stay on the lower end of the cost spectrum.

  • Material Choices: Not all building materials are created equal. Standard red brick is relatively inexpensive and easy to source. However, if you own a historic home and need custom masonry to perfectly match stones from eighty years ago, your materials budget will naturally increase.

  • Labor and Accessibility: Roof pitch and house height are equally important. If your masonry sits on a steep, three story roof that requires extensive scaffolding, labor costs will rise. Contractors must factor in the extra time it takes to safely access the workspace and haul heavy materials up and down.

  • Additional Components: Sometimes a rebuild uncovers hidden issues. You might need a new stainless steel liner, updated flashing to prevent future roof leaks, or a heavy duty cap. These necessary additions protect your new structure but will add to the overall estimate.

Ready to Make the Right Choice?

At the end of the day, deciding between a quick fix and a fresh start comes down to looking past the surface. While patching a few bricks might save you cash right now, it will not fix a failing structure or a leaning stack. Whether you repair minor wear or rebuild to ensure decades of safety, making an informed decision protects your home and your budget.

If you are still staring at those crumbling bricks and wondering what to do next, we can help you figure it out. At A-Z Construction and Restoration, we provide professional Chimney Repair & Rebuilding Services to help you choose the best fix for your situation and keep your chimney in peak shape year round. Give us a call at 315 488 5292 or visit https://a-z-construction.com/chimney-repair-syracuse-ny/ to learn more about our service.

Frequently Asked Questions

  1. Is it better to repair or rebuild a chimney?

It depends on the damage. Minor issues like cracked mortar or a few damaged bricks can be repaired, while structural problems like leaning or severe deterioration usually require a full rebuild.

  1. What is the average cost to rebuild a chimney?

A chimney rebuild typically ranges from $1,500 to $10,000+, depending on the extent of damage, materials used, and labor requirements.

  1. Is it cheaper to repair or rebuild a chimney?

Repairs are cheaper upfront, but repeated fixes can add up. In cases of major damage, rebuilding is often more cost-effective long term.

  1. How do you know if a chimney needs rebuilding?

Signs include a leaning structure, spalling bricks, large cracks, missing mortar, and significant water damage.

  1. How long does a chimney repair or rebuild last?

Repairs can last a few years depending on the issue, while a properly rebuilt chimney can last 30 to 50 years or more with maintenance.

Firebox Mortar Repair in Syracuse, NY – Why It Fails and How It’s Fixed Right

Firebox Mortar Repair in Syracuse, NY — Why It Fails and How It's Fixed Right

By A-Z Construction & Restoration  |  Serving Onondaga County since 1984  |  Updated February 2026

The fine grey powder collecting on your firebox floor between fires is not dust. It is refractory mortar, the material holding your firebox bricks together. And it is falling out of the joints above.

Most homeowners who notice it assume it is a cosmetic issue. It is not. Refractory mortar is the thermal barrier between the fire in your firebox and the structural masonry surrounding it. When it erodes, heat reaches masonry that was not designed to receive it. When it fails entirely, combustion gases find paths into the surrounding structure. In a pre-1980 home in Onondaga County, where the refractory mortar may be 50 or 60 years old and has absorbed thousands of thermal cycles. This is not a slow-developing problem. It accelerates.

Restoring the interior of your fireplace is another step; maintaining the entire venting system with a comprehensive Syracuse chimney cleaning helps prevent chimney fires and improves efficiency.

This guide explains why refractory mortar fails in Central New York fireplaces, what correct repair requires, and why the most common DIY and contractor mistakes make the problem significantly worse. If you are seeing the signs described here, contact us for a free firebox assessment. We serve the full Syracuse metro area and Onondaga County with same-week scheduling.

Aging Syracuse NY fireplace in use showing decades of thermal wear on refractory brick and mortar joints. A-Z Construction & Restoration

What Refractory Mortar Actually Is and Why It Is Not Interchangeable With Standard Mortar

Standard masonry mortar, the material used in exterior chimney joints, brick walls, and concrete block construction, is formulated for structural load bearing and weather resistance. It is not formulated for direct flame exposure or repeated thermal cycling from ambient temperature to 1,000 degrees Fahrenheit and back.

Refractory mortar is a completely different material. It contains fireclay, alumina, and other heat-resistant compounds that allow it to expand and contract with the extreme temperature swings inside a firebox without cracking or losing cohesion. It is softer and more flexible than standard mortar by design. That flexibility is what allows it to absorb thermal stress rather than transferring it to the surrounding brick.

This distinction matters enormously in practice. Standard mortar used in a firebox application will crack within one or two heating seasons. It cannot absorb the thermal cycling and will fail, usually in pieces, leaving the refractory brick it was supposed to be holding unsupported. We regularly encounter fireboxes in Syracuse-area homes where a previous repair used standard mortar. It is always identifiable by its grey color, hard texture, and the fact that it has already begun to fail.

The correct material for firebox repair is refractory mortar formulated to meet ASTM C-199 standards, mixed and applied at the correct consistency, and cured properly before the fireplace is returned to use. There is no acceptable substitute.


Why Firebox Mortar Fails in Central New York

Refractory mortar has a finite service life under any conditions. In Central New York, several factors accelerate that timeline.

Thermal Cycling Volume

A fireplace used regularly throughout a six-month Syracuse heating season undergoes significantly more thermal cycles than one used occasionally in a milder climate. Each cycle from a cold firebox to operating temperature and back places stress on the refractory mortar joints. Over decades, the cumulative stress exceeds what the material can absorb. The joints that fail first are typically at the back wall of the firebox, where temperatures are highest and thermal stress is most concentrated.

Moisture Infiltration From Above

Water entering the chimney system through a cracked crown, failed flashing, or deteriorated flue cap reaches the firebox. Moisture sitting in refractory mortar joints accelerates deterioration by two mechanisms: direct chemical degradation of the mortar binder, and freeze-thaw expansion during the shoulder seasons when the chimney is cold. A firebox that shows rust on the damper or moisture staining on the back wall is receiving water from above, and that water is working on the mortar joints every day the fireplace is not in use.

Age of Original Materials

Most fireplaces in Onondaga County homes were built between 1920 and 1975. The refractory mortar installed at original construction has been absorbing thermal cycling and moisture stress for 50 to 100 years. Even a well-built firebox with correct original materials reaches end of service life within that timeframe. Annual inspection is the standard. In our experience, the majority of the firebox repointing work we perform in the Syracuse area involves mortar that is well past its expected service life and has been deteriorating undetected for years.

Prior Incorrect Repairs

This is the factor that most consistently converts a manageable repair into a significant one. A firebox that was repointed with standard mortar or with a DIY product not rated for firebox temperatures will have accelerated brick damage in the areas where incorrect mortar was used. The standard mortar does not flex with thermal cycling. Instead, it transfers that stress directly into the refractory brick, causing cracking that would not have occurred if the joint had been left open or filled with correct material. Identifying and removing prior incorrect repairs before repointing is a standard part of our firebox assessment process.


The Warning Signs: What Deteriorating Firebox Mortar Looks Like

Firebox mortar deterioration follows a predictable progression. Catching it at the early stages keeps the repair scope modest. Missing it until late stages typically means a partial or full firebox rebuild.

Stage 1: Powder and Dust in the Firebox

Fine grey or white powder accumulating on the firebox floor between uses. The mortar is eroding but the joints still have material in them. This is the best time to act. Firebox repointing at this stage typically costs $300 to $800 and restores full integrity.

Stage 2: Visible Joint Recession

Mortar joints that are visibly recessed. The brick face projects beyond the mortar surface. The joints may appear hollow at the edges. At this stage, the thermal barrier is compromised but the bricks are still in position. Repointing is still the correct repair, but the depth of removal and preparation work increases.

Stage 3: Open Joints and Loose Brick

Mortar is missing entirely from some joints. One or more refractory bricks shift when pressed. Heat is now reaching structural masonry behind the firebox lining during every fire. This stage requires refractory brick replacement in addition to repointing. The scope and cost increase significantly.

Stage 4: Structural Firebox Failure

Multiple loose or missing bricks, visible gaps in the firebox lining, or evidence that heat has reached the surrounding structural masonry. At this stage, a partial or full firebox rebuild is the correct scope. Repointing alone will not restore structural integrity.


What Correct Firebox Mortar Repair Requires

Professional firebox repointing is not a surface application. It is a systematic removal and replacement process that, done correctly, restores the firebox to full thermal integrity.

Full Removal of Failed Material

All deteriorated mortar must be removed to a minimum depth of 3/4 inch before new material is applied. Applying new refractory mortar over old, failed material is the single most common reason firebox repairs fail prematurely. The bond between new and failed material is weak, and the new mortar inherits the instability of what is underneath it. This step is labor-intensive and is the primary reason professional firebox repair costs what it does. It cannot be shortcut.

Assessment of Refractory Brick Condition

Before repointing begins, every refractory brick in the firebox is assessed. Bricks with through-cracks, missing faces, or structural damage are replaced with matched refractory-rated material before new mortar is applied. Repointing around a compromised brick produces a repair that will fail at that brick within one or two seasons.

Correct Material and Consistency

Refractory mortar is mixed to a specific consistency which is firm enough to pack into joints without slumping and wet enough to bond to the surrounding brick. Too dry and the bond is weak. Too wet and the mortar shrinks excessively as it cures, pulling away from the brick edges. Mix consistency is one of the details that separates a repair that lasts from one that doesn’t.

Proper Cure Sequence

New refractory mortar must cure before the fireplace is used. Full air cure typically requires 24 to 48 hours minimum. After air cure, the first fires should be small and short. This is a process called heat cycling that gradually drives residual moisture from the mortar and allows it to reach full hardness. Lighting a full fire in a freshly repointed firebox before proper cure is complete will crack the new mortar at the joints. We provide specific cure and heat-cycling instructions with every firebox repair we complete.


Why the Wrong Repair Makes Things Worse

We want to address this directly because it is a consistent finding in our firebox assessments across Onondaga County.

A firebox repaired with standard mortar, whether by a DIY homeowner or a contractor who did not use refractory-rated material, will typically hold for one season, sometimes two. Then the standard mortar begins to crack and fragment under thermal stress. When it fragments, it does not simply fall away cleanly. It transfers the stress of cracking into the surrounding refractory brick, creating cracks in brick that was intact before the repair. The result is a firebox that now needs refractory brick replacement in addition to repointing which is a significantly larger and more expensive scope than the original repair would have required.

The same applies to surface-applied refractory caulk products marketed as DIY fireplace repair solutions. These products are appropriate for hairline surface cracks only. Applied over open joints or as a substitute for proper repointing, they create a surface seal over a deteriorated substrate that fails within a season and leaves the underlying joint in worse condition than before.

If your firebox has been previously repaired and is showing failure again quickly, the first question our assessment asks is what material was used in the prior repair.


Frequently Asked Questions About Firebox Mortar Repair in Syracuse, NY

Can I repair firebox mortar myself?

Minor hairline surface cracks in sound refractory mortar can be addressed with a correctly formulated refractory caulk by a careful homeowner. Any mortar repair that requires removing deteriorated mortar and repointing joints, which is the majority of firebox mortar repairs we see in the Syracuse area, requires professional execution. The removal depth, material selection, mix consistency, and cure sequence all affect whether the repair lasts. Incorrect repairs accelerate damage to surrounding refractory brick and typically result in a larger, more expensive repair scope within one to two seasons.

How much does firebox mortar repair cost in Syracuse, NY?

Firebox repointing in the Syracuse area typically ranges from $300 to $800 for a standard firebox in good structural condition. When refractory brick replacement is required in addition to repointing, costs range from $500 to $2,500 depending on the number of bricks and extent of damage. Full firebox rebuilds, required when structural integrity has been compromised, range from $2,500 to $6,000 or more. A-Z Construction provides free written estimates with fixed pricing before any work begins.

What is the difference between refractory mortar and regular mortar?

Standard masonry mortar is formulated for structural load bearing and weather resistance not for direct flame exposure or extreme thermal cycling. Refractory mortar contains fireclay and alumina compounds that allow it to withstand firebox temperatures and flex with thermal expansion and contraction. Standard mortar used in a firebox will crack within one to two heating seasons and accelerate damage to surrounding refractory brick. Refractory mortar meeting ASTM C-199 standards is the only acceptable material for firebox repair.

How do I know if my firebox needs repointing or a full rebuild?

Repointing is appropriate when the refractory brick is structurally intact and the mortar joints are eroded or missing but the bricks themselves are in position. A rebuild is required when multiple refractory bricks are loose, cracked through, or missing; when there is evidence that heat has reached structural masonry behind the firebox lining; or when prior incorrect repairs have caused brick damage in addition to mortar failure. Our free firebox assessment identifies which scope applies and provides written pricing for both options when the situation is ambiguous.

How long does firebox mortar repair last?

A properly executed firebox repoint using correctly formulated refractory mortar, with full removal of all failed material and a proper cure sequence, should last 15 to 25 years under normal use conditions in a Central New York heating season. The variables that shorten that lifespan are continued moisture infiltration from above (crown, flashing, or cap failure), unusually high-intensity burns, and deferred maintenance that allows minor joint erosion to progress to brick movement before the next repair.

Why does my firebox keep needing repair every few years?

Recurring firebox repair – the same joints failing within a few seasons of the last repair – is almost always caused by one of three things: the previous repair used incorrect mortar material, the repair did not remove all failed material before applying new mortar, or there is an unresolved moisture source above the firebox that is continuously degrading the mortar. Our assessment identifies which condition applies. A correctly executed repair on a firebox without an active moisture problem should not require repeat attention within a decade.


Schedule a Free Firebox Assessment in Syracuse or Onondaga County

A-Z Construction & Restoration has been repairing and rebuilding fireboxes across Onondaga County for 40 years. Our free assessments identify exactly what your firebox needs, from repointing, brick replacement, to full rebuild, and provide written, fixed-price estimates before any commitment is made.

We serve Syracuse and surrounding communities including Fayetteville, Manlius, Liverpool, Clay, DeWitt, Jamesville, Camillus, Solvay, Skaneateles, Cazenovia, and throughout Onondaga County.

Schedule Your Free Firebox Assessment

Or call 315-488-5292 — Monday through Saturday, 7:00 AM to 7:00 PM.


A-Z Construction & Restoration  |  Syracuse, NY  |  Serving Onondaga County Since 1984  |  Licensed & Insured  |  EPA Lead-Safe Certified

7 Signs Your Fireplace Needs Restoration in Syracuse, NY

SEVEN Signs Your Fireplace Needs Restoration in Syracuse, NY

Most Syracuse homeowners don’t think about their fireplace until the first cold night of October when they light it for the first time in months and something isn’t right. Smoke in the room. A smell that wasn’t there last year. A sound from inside the firebox that’s hard to describe but easy to worry about.

By October, the window for repair before heating season is narrow. The damage that caused those symptoms has typically been developing since the previous winter with freeze-thaw cycles working on refractory mortar, moisture sitting in a cracked smoke chamber through the summer, a damper that seized sometime in March and nobody noticed until now.

After 40 years of fireplace restoration work across Onondaga County, we’ve learned that the homeowners who catch problems early before the first fire of the season pay significantly less and wait significantly less than those who call us after something has already gone wrong. This guide covers the seven warning signs we see most consistently in Central New York fireplaces, what each one means structurally, and when it requires professional attention. If you’re recognizing your fireplace in this list, contact us for a free inspection, with same-week scheduling throughout the Syracuse metro area.

Fireplace restoration specialist repairing firebox masonry in a Syracuse NY home. A-Z Construction & Restoration

Why Syracuse Fireplaces Deteriorate Faster Than Most

Central New York’s heating season runs roughly October through April. That is six months of regular thermal cycling that accelerates wear on every component of the fireplace system. Add Syracuse’s 124 inches of average annual snowfall working on crowns and flashing above, and the moisture that finds its way into fireboxes and smoke chambers below, and you have conditions that age a fireplace significantly faster than the national average.

The majority of fireplaces in our Central NY service area were built between 1920 and 1975. Their refractory mortar, smoke chamber parging, and clay tile flue liners were installed 50 to 100 years ago. Annual inspection is the NFPA 211 standard. In our experience, most Onondaga County homeowners haven’t had one in a decade with many never having had one at all.


1. Smoke Entering the Living Room

This is the warning sign that gets the most immediate attention and rightly so. Smoke in the living space is a carbon monoxide risk, not just an inconvenience. But it is a symptom, not a diagnosis. The cause determines the correct repair, and misdiagnosing it is extremely common.

In Syracuse-area fireplaces, the most frequent causes of smoke backdrafting are a deteriorated smoke chamber (the funnel-shaped masonry cavity above the firebox), a damper that doesn’t open fully, or a flue that is partially blocked. Each has a distinct fix. Treating the wrong one does not solve the problem and delays addressing the actual cause.

  • What it means: Do not use the fireplace again until the cause is professionally diagnosed. Smoke backdrafting indicates combustion gases including deadly carbon monoxide are entering the living space.
  • Likely repair: Smoke chamber restoration, damper repair or replacement, or flue obstruction removal depending on findings.

2. Cracked or Crumbling Refractory Brick

The interior walls and floor of the firebox are lined with refractory brick, a specialized masonry unit engineered for direct flame exposure and extreme thermal cycling. When it cracks or crumbles, heat begins transferring to surrounding structural masonry that was not designed to receive it.

Hairline cracks in refractory brick are common after years of thermal cycling and do not always require immediate replacement. Cracks that have opened, brick faces that are actively spalling, or loose bricks that shift when touched are a different matter. These indicate the refractory lining has lost structural integrity.

  • What it means: Continued use accelerates damage and increases the risk of heat reaching structural masonry. The firebox should be assessed before further use.
  • Likely repair: Individual refractory brick replacement with matched refractory-rated material. Standard construction brick is never an acceptable substitute in a firebox.

3. White or Grey Powder Accumulating in the Firebox

Fine white or grey powder collecting on the firebox floor between uses when no fire has been lit is refractory mortar falling from the joints above. This is one of the earliest and most actionable warning signs a homeowner can catch, because the repair at this stage is modest.

Left unaddressed, the mortar loss continues. The refractory bricks it was holding become loose. The loose bricks allow heat to reach structural masonry. What was a $300 to $500 repointing job becomes a partial or full firebox rebuild.

  • What it means: Refractory mortar joints are actively deteriorating. Catch it now. Repair costs are significantly lower at this stage than after brick movement begins.
  • Likely repair: Firebox repointing with correctly formulated refractory mortar. This is not a job for standard mortar or DIY repair products. The wrong material fails quickly and can create a fire hazard.

4. Water in the Firebox

Moisture inside the firebox after rain or snowmelt is direct evidence that the chimney system above has failed somewhere. The firebox itself is not a water entry point. Water reaching it has traveled down through a cracked crown, failed flashing, an uncapped flue, or a compromised liner.

Water sitting in a firebox damages multiple systems simultaneously: it accelerates rust on the damper assembly, deteriorates refractory mortar joints from above, and if it reaches the smoke chamber, begins working on parging that may already be at the end of its service life. The visible water is the least of the problem. The path it took to get there is what requires attention.

  • What it means: A chimney component above the firebox has failed. The entry point must be identified and repaired or the firebox damage will recur regardless of what restoration work is done below.
  • Likely repair: Crown repair or replacement, flashing repair, or liner assessment depending on the identified entry point. Often involves both chimney and fireplace restoration work.

5. Persistent Odor From the Fireplace When Not in Use

A smoky, acrid, or creosote smell coming from a fireplace that has not been used recently is not a housekeeping issue. It is a ventilation and structural issue. It means combustion gases or creosote residue are being drawn back into the living space through a gap in the system.

The most common sources in Onondaga County fireplaces are a damper that no longer seals, a deteriorated smoke chamber allowing gases to migrate into surrounding masonry, or a cracked flue liner creating a path for combustion residue to re-enter the system when atmospheric pressure changes. All three require professional assessment since the odor source is not always where the odor appears.

  • What it means: The fireplace system has a gap that is allowing combustion byproducts to enter the living space. This is a health and safety concern, not just an aesthetic one.
  • Likely repair: Damper replacement, smoke chamber restoration, or flue liner assessment and repair depending on findings.

6. Rust on the Damper or Firebox Floor

Rust on metal components inside the firebox such as the damper plate, the damper frame, or metal components on the firebox floor is direct evidence of chronic moisture exposure. A fireplace that rusts has been receiving water regularly, which means the masonry around it has been absorbing that moisture for the same period.

Surface rust on a functional damper is less urgent than a damper that has seized and no longer opens or closes properly as a result of corrosion. A seized damper either leaks conditioned air up the chimney all winter or prevents draft entirely. Either condition affects both safety and energy efficiency.

  • What it means: Chronic moisture entry from above. The rust is the symptom. The water source is the problem that needs to be fixed.
  • Likely repair: Water entry source identification and repair (crown, flashing, or cap), combined with damper repair or replacement if the corrosion has affected operation.

7. More Than Five Years Since the Last Professional Inspection

This is not a visible warning sign. It is a condition that allows all of the above to develop undetected. Fireplace deterioration in Central New York does not announce itself until it is well advanced. Refractory mortar erodes gradually. Smoke chamber parging fails incrementally. Flue liner cracks from a thermal event three winters ago may have never produced an obvious symptom.

NFPA 211 recommends annual professional inspection for any fireplace in use. For Syracuse-area homes with six-month heating seasons, pre-1980 construction, and original refractory materials, we consider five years between inspections the outer limit before the probability of undetected damage becomes significant. Ten years is a near-certainty of something that needs attention.

  • What it means: The absence of visible symptoms does not mean the absence of damage. Schedule an inspection before the next heating season begins.
  • Likely repair: Varies. The value of inspection is knowing what you’re dealing with before it becomes an emergency.

Frequently Asked Questions About Fireplace Restoration in Syracuse, NY

How do I know if my fireplace needs restoration or just cleaning?

Cleaning removes soot, creosote, and debris from the flue. Restoration addresses structural masonry such as cracked refractory brick, eroded firebox mortar, deteriorated smoke chamber parging, and failed dampers. If your fireplace has any of the seven warning signs above, cleaning alone will not resolve them. A professional masonry inspection identifies which components need structural attention and which need only maintenance.

How much does fireplace restoration cost in Syracuse, NY?

Costs range from $300 to $800 for firebox repointing, $400 to $900 for smoke chamber parging, $300 to $600 for damper replacement, and $2,500 to $6,000 or more for a full firebox rebuild. Individual refractory brick replacement runs $50 to $150 per brick. A-Z Construction provides free written estimates with fixed pricing before any work begins.

Is it safe to use a fireplace with cracked refractory brick?

It depends on the severity. Hairline cracks in refractory brick are common and do not always require immediate repair. Cracks that have opened significantly, bricks that are loose or missing, or bricks that are actively spalling mean the refractory lining has lost structural integrity. Continued use allows heat to reach surrounding masonry and increases fire risk. When in doubt, have it assessed before lighting a fire.

What causes smoke to come into the room from a fireplace?

Smoke backdrafting into the living space is most commonly caused by a deteriorated smoke chamber, a damper that doesn’t open fully, a partially blocked flue, or negative air pressure in a tightly sealed home. Each cause has a different repair. A professional assessment identifies the actual source. Treating the wrong cause does not solve the problem and delays addressing the real one.

How long does fireplace restoration take?

Most firebox repointing and brick replacement is completed in a single visit. Smoke chamber parging requires 24 to 48 hours cure time before the fireplace can be used. Full firebox rebuilds typically require two visits with a cure period between. We give accurate scheduling estimates at the time of the written quote.

Do you serve Fayetteville, Manlius, and surrounding Onondaga County communities?

Yes. Fayetteville and Manlius are among our most active service areas with the older Colonial and Victorian-era homes throughout those communities having fireplaces that are exactly the age and condition profile we work on most frequently. We serve the full Syracuse metro area and Onondaga County, with same-week scheduling available throughout.


Is Your Fireplace Ready for Next Winter?

A-Z Construction & Restoration has been restoring fireplaces across Onondaga County for 40 years. Our free inspections cover every component of the fireplace system including firebox, refractory lining, smoke chamber, damper, and connected chimney and result in a written estimate with fixed pricing before any work begins.

We serve Syracuse and surrounding communities including Fayetteville, Manlius, Liverpool, Clay, DeWitt, Jamesville, Camillus, Solvay, Skaneateles, Cazenovia, and throughout Onondaga County.

Schedule Your Free Fireplace Inspection

Or call 315-488-5292 — Monday through Saturday, 7:00 AM to 7:00 PM.


A-Z Construction & Restoration  |  Syracuse, NY  |  Serving Onondaga County Since 1984  |  Licensed & Insured  |  EPA Lead-Safe Certified

7 Signs Your Garage Floor Needs Repairs & Restoration in 2026

7 Signs Your Garage Floor Needs Repairs & Restoration in 2026

You know that feeling when you walk into your garage and something just feels… off? Maybe you’re asking yourself, “why is my garage floor always so dusty?” or “what caused this new crack where I park my car?” But what if you were told that those aren’t just little annoyances?

Many of us think of concrete as being permanent and unbreakable. However, the truth is, your garage floor is a tough-as-nails workhorse that puts up with a lot—from the weight of your vehicle and changing seasons to spilled oil and daily foot traffic. And over time, all that stress starts to show.

The good news is that modern solutions have evolved, and you don’t need to live with a crumbling, ugly floor. As we move into 2026, the huge mess and cost of replacing a garage floor is often unnecessary and in most cases, a professional garage floor restoration can bring it back to life, making it stronger and more beautiful than the day it was poured. Let’s look at the seven signs that it’s time for your garage floor to get the help it needs.

When working on a home improvement or construction project, whether it’s building a garden wall, laying a patio, or repairing brickwork, one question often arises: Can I cut bricks with a tile saw? While the answer is yes, it comes with limitations. Tile saws, especially wet models, can cut thin bricks, but they’re not designed for heavy-duty masonry work. Masonry saws, on the other hand, are purpose-built for cutting bricks, blocks, and stone, making them the professional choice for durability and precision.

In this guide, we’ll compare tile saws and masonry saws, explain how to cut bricks step by step, cover safety essentials, and explore alternatives. We’ll also focus on what homeowners and masonry contractors in Syracuse, NY, need to know before starting a brick-cutting project.

1. Webs of Hairline Crack

Remember that single crack you spotted under your car? On its own, a hairline crack might not be a huge deal. But when that one crack invites its friends and starts forming a spiderweb across your floor, it’s your first clear sign that you need to start repairing garage floor cracks.

So, what’s actually happening here? Think of your concrete slab like a giant sidewalk. When the ground underneath shifts slightly with the seasons, or if the concrete itself was a little weak when poured, it relieves the stress by cracking. This is often when homeowners start searching for how to handle large cracks in garage floor surfaces, as water can seep in, freeze, and slowly make the problem worse.

This is where a simple garage floor fix becomes important. The goal isn’t just to cover them up. A professional service will properly clean and fill these cracks, which is a crucial first step in any lasting garage floor concrete restoration. It’s all about creating a solid foundation for the beautiful floor that comes next.

2. The Floor is Uneven or Sinking

Now, let’s talk about something you can feel with your feet. If walking across your garage feels a little like hiking on a gentle hill, you might be dealing with an uneven garage floor. This is different from just cracks, as you might notice puddles that never drain or even find that your car door swings shut on its own when you park.

This often happens when the soil underneath compacts or washes away over time. It’s a common reason people start looking into leveling a garage floor. This isn’t just a tripping hazard; an uneven surface can prevent water from draining properly, which can lead to the very cracking we just talked about.

So, “what’s involved in garage floor leveling?” It’s all about creating a perfectly flat, stable base. This crucial step, often part of a full garage floor restoration, is the “reset” your floor needs before any new coating is applied.

3. The Surface is Pitted and Rough

Now, let’s zoom in on the surface itself. If your garage floor has started to look like a rocky path, with a rough, crumbly texture, you have what’s known as a pitted garage floor. This is the classic worn concrete floor, often caused by winter salt, chemical spills, or just years of abrasion.

So, “what’s the best way to fix a pitted garage floor?” This is where smoothing rough concrete through professional grinding is the essential first step. It’s the perfect preparation for concrete resurfacing, which essentially gives your old slab a brand-new, incredibly durable top layer and is a fantastic long-term garage floor fix.

4. A Chalky Dust Coats Everything

Let’s talk about a problem you might be constantly battling; dust. If you ever find yourself asking, “How do I stop my garage floor from being so dusty?” you’re dealing with something called concrete dusting. That fine, gray powder isn’t dirt from outside; it’s actually the surface of your floor slowly wearing away.

This happens when the top layer of concrete weakens and breaks down under foot and vehicle traffic. Simply sealing a garage floor with a cheap product often won’t solve this. What you really need is a professional garage floor repair that comes with the most durable concrete coating. This specialized coating bonds permanently with the concrete, creating a hard, non-porous shell that locks the dust in for good.

5. Stubborn Stains and Tire Marks Won't Budge

Moving onto those stubborn marks that just won’t come out. In case your garage floor looks like a map of every oil leak and chemical spill from the past decade, you’re probably wondering if you can really refinish concrete garage floor surfaces to look new again. The answer is absolutely yes!

Those deep-set stains mean your concrete has been absorbing liquids for years because it didn’t have a proper protective seal. This is where the magic of repairing garage floor surfaces comes in. The process isn’t just about covering up old stains – it involves patching garage floor imperfections and applying a new, non-porous surface that completely transforms its looks. Think of it as giving your floor a fresh start that’s both beautiful and practical for your daily use.

6. Your Floor Has More Holes Than a Golf Course

Just like stubborn stains can make a floor look tired, a surface full of small, coarse holes makes it feel damaged beyond a simple clean-up. If your floor is starting to resemble Swiss cheese, this is a classic case of pitting, which calls for specific attention to repairing pitted concrete.

These little craters often appear after winter, where moisture freezes and expands inside the slab, or from chemical spills slowly eating away at the surface. It’s a clear signal your floor needs more than a simple patch job. Addressing this damage is a fundamental step in redoing garage floor surfaces the right way., since the process carefully fills every imperfection to create a flawlessly smooth foundation, giving you a beautiful and durable finish that lasts for years to come.

7. Water Pools or a White Powder Appears

After noticing all the cracks and pits, you might spot something else, like puddles that stick around long after you pull in a wet car, or a strange white, chalky powder on the surface. That powder is called efflorescence, and it’s a sure sign of moisture moving through your concrete.

This is different from the pitting caused by moisture, as this shows water is actively traveling through the slab from below. Left alone, this constant dampness can break down the concrete from the inside and bring apart any coating you put on top. Addressing this moisture is a non-negotiable final step before any true restoration can begin, which makes sure your new floor stays dry and intact for the long run.

When It's Time to Call in the Experts

Sometimes, the signs are clear that a DIY fix just won’t cut it. When you see multiple issues at once, maybe a cracked, uneven, and pitted surface all in one, this is one of the biggest signs you need to call a concrete garage floor repair service.

You might find yourself searching for “how to repair cracks in garage floor that keep coming back?” That’s your cue that the problem needs a professional diagnosis. A trusted pro can assess whether those cracks are minor or point to a deeper issue with the slab itself. Bringing in an expert at this stage saves you time, money, and the frustration of temporary fixes, ensuring your garage floor is restored to a safe, durable, and like-new condition.

Conclusion

So, there you have it. As we look ahead to 2026, knowing how to spot these signals, from the first spiderweb cracks and unsettling uneven spots to the constant dust and stubborn stains, is more valuable than ever. Your garage floor has a whole vocabulary for telling you it needs attention, and catching these signs early is the key to preventing more extensive damage. 

If after reading this, you’ve recognized a few too many of these signs in your own garage, it might be time for a professional assessment. Our team at A-Z Construction & Restoration specializes in bringing worn-out garage floors back to life. We provide expert Floor Repair & Restoration services designed to return your garage floor to a like-new condition. Give us a call at 315-488-5292 or visit our detailed service page at A-Z Construction to learn more about how we can help.

Frequently Asked Questions

Yes, absolutely. In most cases, professional garage floor restoration techniques like resurfacing can repair damage and apply a new coating, making a full slab replacement unnecessary.

The dust, called concrete dusting, means the surface is breaking down. It happens when the top layer of concrete weakens from wear, traffic, and a lack of a proper protective seal.

Widening or spiderweb cracks are a serious sign. They allow water to seep in, which can freeze and expand, making the cracks larger and potentially leading to structural issues over time.

Fixing an uneven garage floor often involves a process called leveling. Professionals use self-leveling compounds to create a flat, stable surface, which is a crucial step before applying any new coating.

The white powder is efflorescence. It is a clear sign of moisture moving through your concrete from below, which needs to be addressed before any restoration to ensure the new coating adheres properly.

7 Important Questions to Ask a Driveway Contractor Before Hiring

7 Important Questions to Ask a Driveway Contractor Before Hiring

When you want to upgrade your driveway, the first step is to hire a professional contractor who knows exactly what to do. Before hiring, you must understand how a professional contractor can make a real difference. But what to ask from professional driveway contractors is important, because asking these questions early helps you avoid delays and costly damage to your driveway. 

Different Contractors have a variety of knowledge and experience, but when you do not have a clear idea about the driveway, material, their costs, and the root cause of the problems, you will end up with drainage, surface, and many other problems that you did not even expect, that are not discussed upfront.  

Key Things to Know Before Driveway Installation

Before installing a driveway, you must know the mistakes during installation and discuss them at the time of hiring a driveway contractors. But even before hiring, you must know: 

1. Project Goals

Create a checklist that outlines your goals and clearly defines your objectives and expectations for the contractor, so that they consider the purpose, desired appearance, and functional requirements before planning and building or repairing.  

2. Budget Planning

If the project is planned according to the decided budget, it ensures that you can choose a contractor who offers quality services within your financial constraints. So, being realistic, you have to tell your contractor a clear quote of price that represents your budget for your driveway project installation,considering all potential costs, including materials, labor, and any unforeseen expenses.  

3. Timeline Expectations

When you are starting a project, first of all, you must calculate when your project may start and end, and fit your schedule and standards. Discuss the decided time with the potential driveway contractors so they work accordingly, evaluate he project timeline and how it fits your schedule. Discuss the estimated duration of the project with potential contractors and ensure that their timelines align with your availability and expectations.

After knowing the key features, you have to checklist to consider these 7 questions that you may ask a driveway contractor that give you insight into how a contractor works, how much they have knowledge, and how they will work on the project. 

1: Are You Properly Licensed and Insured?

Before starting a project, you must ensure that your contractor is licensed and insured so that if anyone wants to see the proof, they should be able to show of current licensing and insurance. This includes general liability coverage and workers’ compensation. If any accident happens or property gets  damaged, these policies protect both you and the team as well.

Ask your contractor to show the documentation, and then make sure the name on the policy matches the name of the company you are hiring. It is the best possible way to spot contractors operating under different names or those without proper coverage. A-Z Construction & Restoration holds all necessary certificates and holds full insurance, and is ready to provide that information when asked. 

2: What Makes Your Company Different from Others?

By asking this question, you can know the values and approaches they are using, giving you room to choose the best contractor for your driveway project. If you get a strong answer that includes proper details about the team, training sessions, communication, and process, that means you are choosing the best.  Because the weak one starts the conversation with prices and ends it on vague promises.

A-Z Construction & Restoration, our experienced team delivers professional driveway services to homeowners across the region. By merging quality craftsmanship and lasting materials, we bring lasting results with consistency. Our team responds quickly, explains every step, and deals with every project with proactive approaches and clear communication skills.  

3: Do You Offer a Written Contract that Contains all Details of Work?

It is important to ask any contractor whether they will make proper contact or not because a specific contract protects everyone who is involved. Containing the full scope of the project, it includes all specific outlines, materials, timelines, prep work, and payment terms. Without a clear quotation and agreement, you may find difficulties in the future, as you have no idea about the process and what happens if plans need to expand.

Many contractors start the process with a handshake agreement without keeping anything clear or any written document, even without keeping the communication transparent. Our contractors are accountable as they draw a complete picture of whatever they will take steps to complete the project. If something is messy or not clear or does not make sense, we explain it, because everyone benefits from shared expectations. 

4: Ask for a Free Estimation and an Exact Estimation?

First of all, contractors may visit your property and provide you with a quote that refers to the materials cost and labour, giving you a complete sense of whether your project is matching with your budget or not. So it is important to ask your contractor if they provide a free estimation and a clear quote. You must know that here estimates that seem too low, or leave out details, may move you forward with shocking costs and extra charges later.

What if your mind changes during the construction of the project, like you want to add a different material or change the layout, and it leaves you with confusion about what to do now? Here, you must be clear that if such a situation occurs, what is the solution, and how the contractor can help you with that. A-Z Construction & Restoration handles such problems and adjusts prices in such a way that both parties enjoy the result with clear communication. Our contractors provide you with a complete upfront of the project so you can budget confidently and avoid surprises.   

5: How Do We Start the Project?

The most important thing that you need to know that how a contractor starts the project. If the contractor answers that they will start with base preparation, then you are working with the right person. Because without a well-constructed base, even high-quality materials shift, crack, or sink over time. 

But a professional starts with planning and preparing the site and creating a stable base of gravel, then installs structures or frames that define the shape of the driveway and slope. After laying down rebar or wire mesh for reinforcement, they filled it with concrete. And then they level and smooth the wet concrete with tools like a screed and bull float. Finally, they end the process to control joints that are cut to prevent cracking, the surface is finished, and the concrete is allowed to cure for at least seven days, during which it must be kept moist, before light use. 

At  A-Z Construction & Restoration, this is the complete process we apply to get desirable results without compromising quality. Our team builds each base with durability, using compatible materials and verified methods that support structure and drainage.

6: Do You Provide Warranty? If yes, then Which Kind Of?

While asking for a warranty, you must know what it is and how it works. Some warranties cover materials, while others cover the workmanship. Both are important and should be clearly explained in writing. But here is the question that you need to ask the contractor that whether the warranty is involved or not, if yes, then what is the type? Here is a red flag that if they avoid discussing this topic, then your whole project is at risk. 

But A-Z Construction & Restoration provides a clear warranty that includes the type of warranties on all residential projects. If anything is not written in it should be due to installation issues, and you can clearly mention that we are open to discussing and negotiating. 

7: Can I See The Most Recent Portfolio?

Before hiring any remodeling contractor, you must check the previous work or even cross-check the feedback of past clients of the business. And if everything goes unnoticed or smoothly, then you’re on the right track to the hiring process. For satisfaction, ask for the previous photos; it helps to see examples that reflect different sizes and complexities. If you get a reference link, it also gives you a chance to ask how the team communicated, how the job site was completed, and how satisfied past clients were with the final result.
We are always glad to provide references and examples of past paving and driveway projects, because we aim to provide evidence that speaks for itself. 

Wrapping Up

The above given questions will help you to hire a contractor as well as save time, money, and your home.  With the help of our guide, you can set the stage for a better experience from start to finish.

We welcome those questions and believe homeowners should feel confident asking about licensing, estimates, warranties, and everything in between. Because we know it is your driveway, and you should feel good about the team putting it in.